Welcome to the Create it REAL Developer Portal!
Create it REAL developer portal is a one stop shop that provides an
opportunity for innovation
using
Create it REAL's APIs
to deliver innovative services such as Slicing as a service.
This documentation is created to provide you all the information
you need to connect to
Create
it REAL
APIs.
We
recommend you go ahead and try our Sandbox:
You can start playing with the Sandbox to better understand what can be accomplished
with each endpoint.
Enjoy Create it REAL's REALvision API.
Discovery
Documentation Conventions
Endpoints are described with an HTTP method and a path.
Example:
POST /ws/tasks
Prepend the REALvision API URL to the path to get the full endpoint URL.
Example:
Curly brackets, {}, in the path indicate a placeholder
value that you must replace.
Example:
GET /ws/tasks/{taskId}
This API is a REST Api that mainly uses the JSON format, which means that the requests should have a Content-Type of application/json.
It basically means that the body of the requests you send (Other then GET requests which don't have a body), must be raw JSON data.
It also means that the response you get from this API will almost always be in JSON.
Error codes & Responses
HTTP Code
Description
200 OK
Successful request.
400 BadRequest
The request sent by the user is wrong in some way.
404 NotFound
No elements found with the given information.
401 Access Denied
Your credentials don’t allow you to access this information or have expired.
500 Internal Server Error
Internal server error.
In addition to the HTTP Error Codes you receive in the headers of the response, the body of the response will contain a JSON error object with more information on what exactly went wrong.
The JSON response will have the following schema:
You can use the errorCode property for error handeling on your front-end application.
Each error has an explination message that explain what exactly went wrong.
Most of the errors are related to unauthorized access, wrong input or a malformed request. Some are related to the slicer, this is a list of the possible errorCodes that you might receive:
Error Code
Description
URE000
The body of the request is missing something or is not well constructed
URE001
Wrong file extension, please provide an Workspace file (.rvwj)
URE002
Wrong config file extension, please provide a workstation file with the following extension: .xml
URE003
The configs file for the printer requested could not be found.
URE004
The configs file provided is null or empty
URE005
The TaskId provided is not valid, please provide a valid TaskId
URE006
File not found, please provide a valid TaskId
URE007
The TaskId provided is already in use, to check the progress of the slicing task, call the /GetProgress endpoint.
SF000
The slicing task failed, please try again later
Sign up and login
To start developing with our APIs, you’ll need to sign up for a
developer account. Here is what
you do:
Fill in your information and complete the captcha challenge then
click on the blue Sign
up button.
Next, you'll automatically recieve a confirmation email so that we
can verify your email.
Please
check your inbox and click on the confirmation link in the email you
received.
You'll be redirected to a page where you will re-enter your password
and click on Sign
up.
Congratulations, you are now signed up and you can login in anytime
using your email
and password.
Request a Subscription Key
Now that you are signed up, you can login to the Developer portal at
anytime using your email and
password.
That being the case, the next step is to request a Subscription Key by
following these steps:
When you login to the developer portal, go to the Products
page.
Each Product contains a set of APIs. And you, as a developer,
subscribe to a
Product and not an API. That way, you can use one
subscription key for several APIs
in case you were given access to more then one api.
Choose a product from the list.
You'll be redirected to a page where you can see the APIs available in that product, that's also where you will be subscribing to one of our Products.
Enter the name you'd like to give the subscription. You'll notice a blue Subscribe button to the right. Click on it.
Congratulations, you just subscribed to the REALvision Online product.
However, you'll need the approval of the API team first before you could receive the
Subscription Key and start calling the API.
Once your subscription request is approved, you will recieve an email
notification with all the
details needed to start consuming the API.
Obtain the Subscription Key
You're getting closer to finally getting a Subscription Key, the next
steps assume you have been
granted approval to use our APIs by the API Team. If you were granted
approval, you will have
received a notification email notifying you that your request has been
accepted.
That being the case, the next step is to get a Subscription Key by
following these steps:
You'll see information about you
and your subscriptions.
You'll see that the Subscription Key is hidden with "xxxxxxxxx ....". To see and copy the
Subscription Key, click on show.
Note that when you use our integrated Sandbox, the API key will be filled in for you automatically.
Congratulations, you now have a Subscription Key that you can use to
consume our APIs.
What's next?
Now that you have an API key, you'll be able to consume our APIs freely.
Important: The API is still in its early stages, which
means that it will
undergo a lot of changes along the way while incorporating feedback from
our customers and partners. Keep in
mind that these endpoints might change in the
future.
You want more details ?
To start testing the endpoints online, head to: Sandbox
Workspace
This API heavily depends on how much you understand a Workspace file. We decided to use the Workspace file for this API due to many reasons, chief among them is tha fact that STL files lack a lot of information needed to slice a 3D Object:
Positionning
Scale
Rotation
Material Color
Relative positionning in relation to other objects (Comes in handy when using Modifiers )
Hence, the Workspace specification was born. It is designed to include all the information above and more.
REALvision Workspace Specification
This section describes the structure of a REALvision Workspace file and gives you a tool you can use to
easily generate a
Workspace file given an STL file.
To download an example workspace file, click :
cubetest.rvwj
To understand the structure of that same example workspace file, keep reading.
Note 01 :
Workspace files have the extension: .rvwj, they use the JSON
format. Comments are not allowed in JSON files but they have been added in the
following code snippet for documentation purposes. There is no need to use this
code for testing because the same code without comments is provided above for
testing.
Note 02 :
By convention the Convex Hull (Bounds) and Model vertices should be in absolute
coordinates, meaning that the object should have all transformations applied
("baked in") before generating the workspace.
Note 03:
The position, rotation, scale and mirroring
parameters in the file should be left at transformations the defaults and are
only part of the file for legacy purposes.
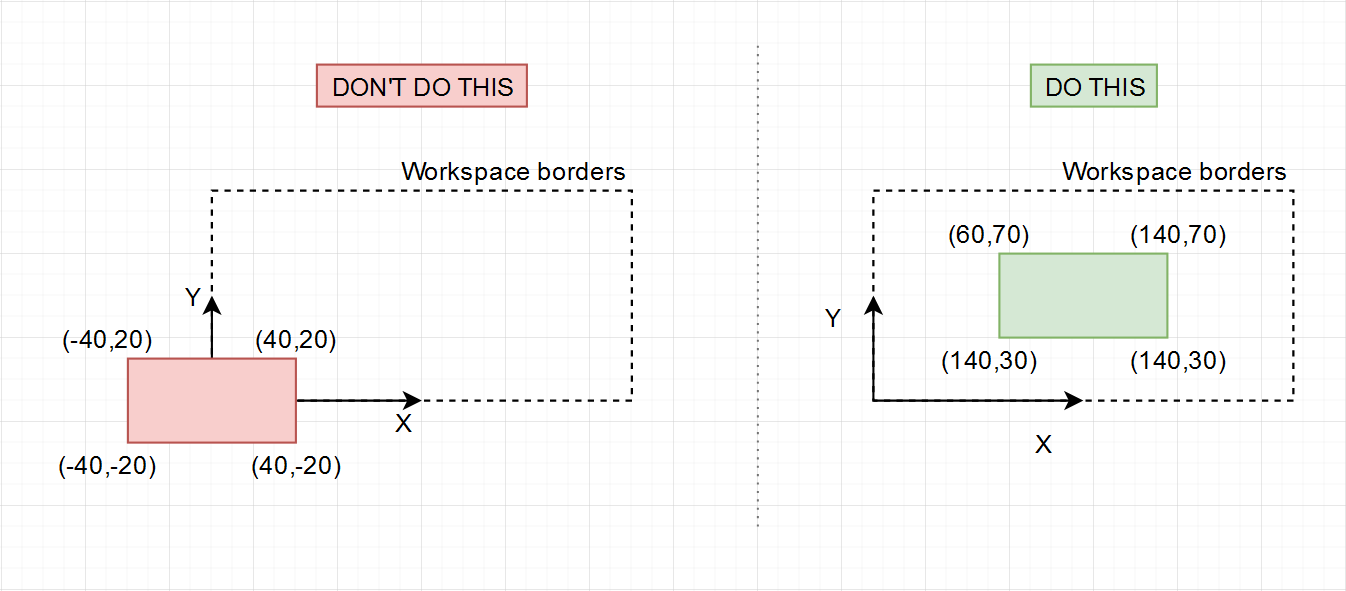
When generating the Workspace, make sure the coordinates of the model are absolute coordinates in reference to
the
Workspace, not the model itself. It is important that the model doesn't go out of the bounds of the Workspace
for the
slicing task to finish successfully.
Using Modifiers
This section describes how to use the Modifier feature.
But first, let's get a good handle on the concept.
What are Modifiers ?
A Modifier is an object with special settings. You can use it to modify a specific area of a different object. You do so
just by overlapping the said Modifier object with a specific area of the object whose settings you
want to modify.
The modified object won't change its settings except for the area affected by the Modifier.
Note:
At the moment, Modifiers support changing one single setting which is the
Infill Density.
More settings coming in the future, settings like:
Infill Type
Resolution
A simple example to illustrate the Modifier feature would be taking two cubes:
Cube A and Cube B. Both are objects, Cube A is a regular object and Cube B is a Modifier object.
Cube B has the power to change one of Cube A's settings, in this case, that
setting is the Infill Density. Meaning, Cube B can change the
Infill Density of Cube A in a limited area and NOT the
entire object.
The area in which that change takes effect is limited to the intersection of the two objects.
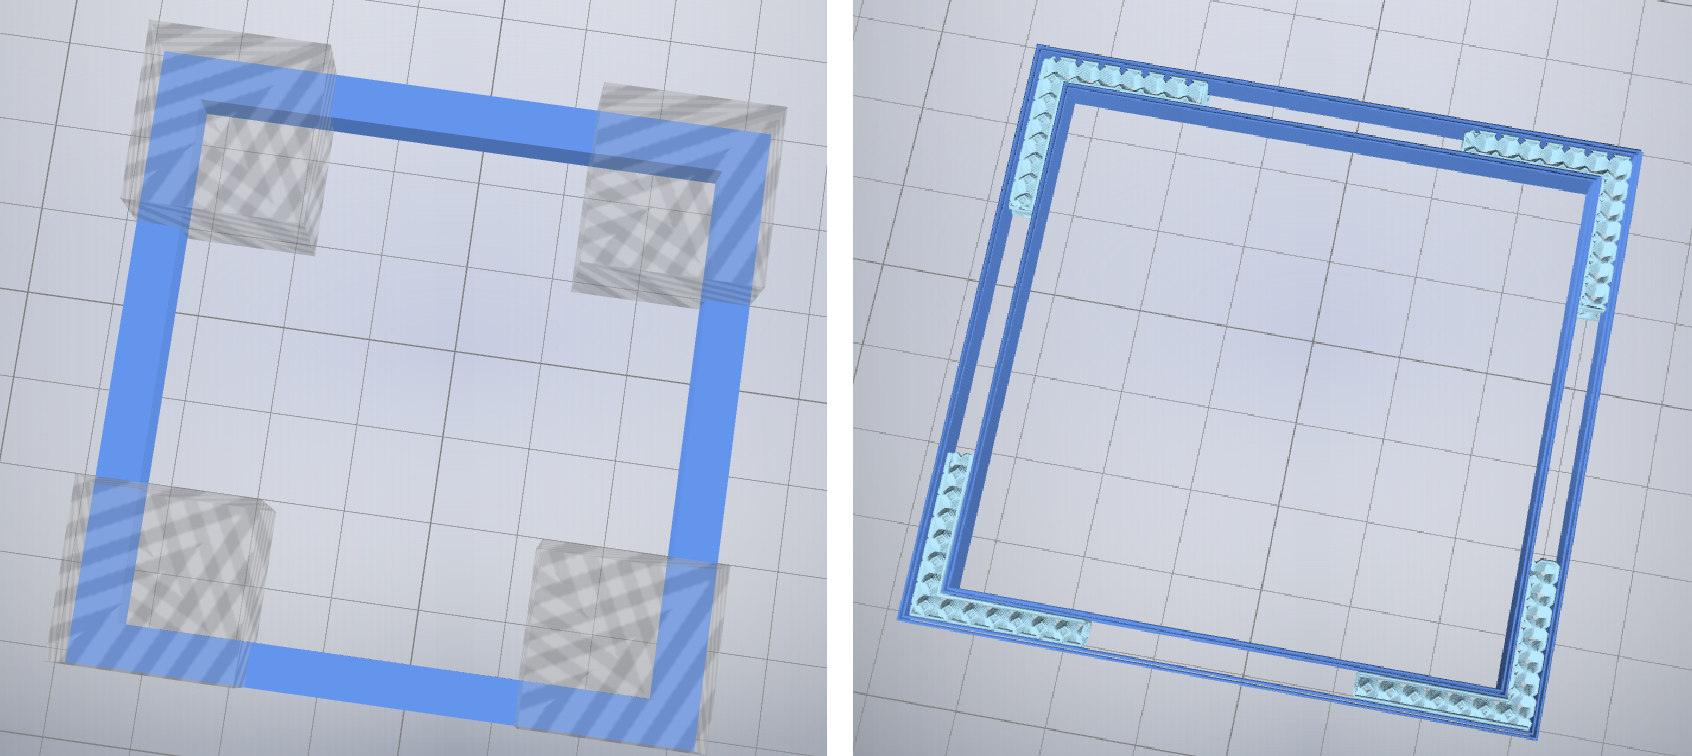
Take a look at the following image:
You'll notice two cubes intersecting. The blue cube is Cube A. It's the cube whose settings we
want to change in just a limited area and not in the entire object.
The other grey cube, is the Modifier. It has an Infill Density that is different
from Cube A's Infill Density.
To illustrate the feature, let's take a look at the infill of Cube A:
You'll notice that the Modifier disappeared, and that the intersection area has a different
Infill Density.
And that is how you use Modifiers, some of the interseting use cases for this are:
Increase strength with higher infill density in fragile regions.
Decrease material waste in regions with no need for
it.
Bonus example:
Hopefully, you now understand what are Modifiers and what are some use cases where they will come in handy.
Next, let's learn how to actually use them in our Workspace API.
How to use Modifiers in the Workspace API ?
Long story short, you're going to need a Workspace file. That Workspace file should contain at least one model to slice and one Modifier model.
Meaning, it should contain at least two models.
The Workspace file contains data about the models we're going to use. Technically speaking, it contains a property
called models, it's an array that contains as many models as there would have been if we were using
Realvision PRO or any other type of slicer.
So, each model in that array, has it's own data (properties). One of which is the metaData
property that we are interested in.
The metaData property can be different depending on the type of model (Modifier vs Non-Modifier). And here are examples:
When using Modifiers there are a few golden rules to upholad:
All models must have the SlicingPrioritydefined in their metaData:
All objects (the non-modifiers), have a priority of zero: 0
All modifiers must have a non-0 priority defining in which order their settings take priority (relevant when they
overlap). Low numbers first, high numbers last.
Assign a Modifier configuration to the modifier model using the Modifier property:
The only modifiable setting we have available at the moment (more are coming) is FillDensityFactor, which is double defining the infill ratio in the range between 0.0 and
1.0, where 1.0 means completely solid, and 0.0means no infill.
For a full example of a Workspace file in which a Modifier is used, take a look at this file:
Download
Point Cloud (Shore Values) format :
This section describes how to use the Point Cloud feature.
In the previous section, we took a look at how we can use a Modifier to change the Infill Density of a model.
However, that Infill Density is constant throughout the whole Modifier. It's basically the same density in every single Point
inside the Modifier. In other words, every point in the final object will have the same hardness.
What if we want to have a variable hardness for different points on the same object?
The good news is, you can do that. It's possible by using the Point Cloud feature along with a Modifier. Which we will explain in this section.
In the previous section, we used two cubes. one is a Modifier and the other is the model we want to slice.
In this example, we will do something similar. Except, we won't be changing the properties of just one part of the model to slice.
We will change it for the whole object, meaning that we will put the entire model to slice, inside the Modifier.
So, to recap what we have so far:
We're going to need two models: The model to slice + the Modifier.
The model to slice will be encapsulated by the Modifier.
The Modifier will have a special property that relates to the Point Cloud feature.
All of the above will be specified in a Workspace file.
Now, what special property?
In the previous section, we mentioned that the Workspace file contains a models property that contains the models that
are relevant to the slicing task. Each model has its own metaData property, and it's different for Modifier vs Non-Modifier objects.
The Workspace file is almost the same when using the Point Cloud feature, the only difference is in the Modifier model's metaData:
The Modifier object will no longer have an FillDensityFactor property, hence the metaData -> Modifier object will be empty.
The Modifier object will have an additional property in its metaData called FileReference, it's a reference to the file containing the
shore values. A concept we will explain in a bit.
In the meantime, here is an example of a Modifier object's metaData that uses the Point Cloud feature.
So far, we only explained how to use the Point Cloud feature in the Workspace file. But we haven't really delved into what is a Point Cloud or what are Shore Values.
Well, to use the Point Cloud feature of our API, you're going to need to upload not just one file, but two. The two files are
the Workspace file and the Shore Values (Point Cloud) file.
The Point Cloud file is a binary file containing a 3 dimensional array of doubles, each number representing the hardness
at that specific point in the grid. A Point Cloud of 3x3x3 voxels will have a voxel size of 1x1x1mm if the bounding box
is defined by the points (0,0,0) and (3,3,3). If the same bounding box contained a 30x30x6 grid of voxels
( arrayDimensions), then the voxel size would be 0.1x0.1x0.5mm.
You, as the user of the API need to specify the grid of voxels mentioned above. You do so when you use the POST /ws/tasks endpoint, by providing an
array of 3 values in the property called arrayDimensions, if we continue on the example above, you would be providing
the following values: arrayDimensions: [30, 30, 6].
A golden rule to be aware of is:
Make sure the FileReference mentioned in the Worksapce file is the same as the actual name of
the Shore Values file.
Workspace Generator Tool
Now that you have somewhat of a good grasp on the structure of the workspace file, how about we generate
some of
them?
First, we need the following prerequesites:
You will also need to have Node Js installed. For
more information on how to
install Node Js: Install
Nodejs
One more thing, you will need to have Git installed.
It is not required, but it would help more if you do install
it.
For more information on how to install Git: Download
Git.
Second, let's download the tool.
Open up a CLI anywhere you like and clone the following Github repository:
git clone https://github.com/createitreal/wsgenerator
Next, navigate to the project folder you just clone and then execute the following command to install the
dependencies of the project, there aren't many, so this shouldn't take too much time.
cd wsgenerator
npm install
If you don't have Nodejs installed, the command above won't work.
NPM is a package manager much like Nuget or Bower, but for Nodejs.
It comes preinstalled with Nodejs so you don't have to install it yourself.
We have prepared a few STL files for you to use for testing, they are stored in the ./assets/stls
folder and they
are the files we will be transforming into Workspace files.
The resulting workspace files will be stored in the ./assets/wsfiles folder.
npm start
What that command does is basically just run the index.js file, so it can be translated to a
simple: node index.js
You'll get the following result:
> ws-generator@0.1.0 start C:\Users\ikteru\Desktop\Workspace Files
Generator\github_wsgenerator\wsgenerator
> node index.js
File [ 20mm_cube.json ] successfully saved at [
C:\Users\{YOUR_USERNAME}\Desktop\wsgenerator\assets\wsfiles\20mm_cube.json ]
File [ calicat.json ] successfully saved at [
C:\Users\{YOUR_USERNAME}\Desktop\wsgenerator\assets\wsfiles\calicat.json ]
Congratulations, you just generated not one, but two workspace files.
Of course, information about the to be used to slice the STL file should be factored in the workspace
generating process,
and as a matter of fact, you can do that by changing the printer.json file in the
./configs folder.
We used one of the most common printers for this example: CR10.
The default values will work most of the time, but if you have a special case, feel free to contact us and
we'll
examine it and contact you.
Getting Started
Here, you're going to learn how to quickly start Slicing Workspace
files on the cloud which
is the main functionality of the REALvision API.
But before we start, you're going to need the following prerequesites:
An account in the Create it REAL developer portal. ( To get
an account, follow this
tutorial: Sign up
and Login)
Information on the several API calls to make in order to slice an
Workspace file in an
easy to understand interaction flow diagram.
Basic general information on how to make HTTP calls to an API. It
includes examples that
are relevant to the REALvision API.
If you're already familiar with one or both of the above information. Feel
free to skip to the
Quick Start.
REALvision API flow:
Note: All API calls are made to
https://realvisiononline.azure-api.net/v0.3 followed by
the resource name.
example:
https://realvisiononline.azure-api.net/v0.3/ws/tasks/
This API's main functionality is Slicing
Workspace or STL files.
In other words, turning Workspace files into an Fcode file
that Create it REAL
powered 3D printers can understand, or a Gcode file that most other printers can understand including Create it REAL powered printers.
General HTTP request information:
Generally speaking, when you make an API request, you specify 4 things:
The HTTP Method:
GET
POST
PUT
DELETE
....
The API URL and the Endpoint(Resource) you're calling.
Example:
https://realvisiononline.azure-api.net/v0.3/ws/tasks
In this case, the URL is https://realvisiononline.azure-api.net/v0.3 and the
resource is /ws/tasks
Some APIs are secured and can't be called unless some type of
Authorization to authenticate the caller is used. And to call a
secured API, you
need to
include a Header called Authorization in the API
request.
Example:
"Authorization": "Bearer eyJ0eXAiOiJKV1QiLCJhbGciOiJSUzI1N ... "
There are several types of ways you can Authorize an HTTP request,
the one used in
the
example above is called a Bearer Token and it's the one we'll be using for this API. Other types
are :
No Auth
Bearer Token
Basic Auth (username and password)
Digest Auth
OAuth 1.0
OAuth 2.0
...
Headers:
HTTP headers allow the client (Your application) and the server
(The API) to
pass additional information with the request or the response.
They're usually used for
Authentication and Caching purposes.
The Authorization header illustrated in the example above is one
of those Headers.
In our case, we will be using both the Authorization header and our own custom header.
Meaning that in order for you to call the API,
you're going to include two
Headers with the request.
One of them will be called Ocp-Apim-Subscription-Key and
it's value will be the
Subscription key you received from us:
"Ocp-Apim-Subscription-Key": "761iioaziui212ac6a49fd91156ef469c"
(To request a Subscription Key, follow this tutorial.
).
And the other one will be the Authorization header and its value will be the token you will
receive from our Authorization server:
When you make a POST request, you usually send data with
the request.
But where is that data included? It's included in the
Body of the request.
However, how do we specify the type of the data that we will be
sending? It can be JSON,
it
can be form-data, it can even be a binary file!
Well, we do that using a Header called
Content-Type.
A POST request is typically sent via an HTML form and results in
a change on the server.
In
this case, the content type is selected by putting the adequate
string in the enctype
attribute of the form element or the formenctype attribute of
the input or button
elements:
application/x-www-form-urlencoded: the keys and
values are encoded in
key-value
tuples separated by '&', with a '=' between the key and
the value.
Non-alphanumeric
characters in both keys and values are percent encoded: this
is the reason
why this
type is not suitable to use with binary data (use
multipart/form-data
instead)
multipart/form-data: each value is sent as a block of
data ("body part"),
with a
user agent-defined delimiter ("boundary") separating each
part. The keys are
given
in the Content-Disposition header of each part.
text/plain
API Clients
You can test our APIs with one of the following ways:
We'll illustrate how to test one of the endpoints using the Sandbox.
If you chose one of the APIs, you'll be able to see a list of the endpoints available in that
particular API,
click on the /ws/tasks endpoint.
You'll notice that each endpoint has it's own endpoint title, a button you can click to try that
endpoint
online and a section that has information about how you can formulate the request.
And also a section that has information about how the response will be. If you click on the Try
it button,
you'll be able to see code samples in several programming languages for you to test with and an
interface you can use to execute
HTTP requests right there.
Click on the Try it button.
You'll notice that the Subscription key is already filled in
for you.
If it's not, then you might not have a Subscription Key yet, to ask for one, head to:
Request Subscription Key
.
In case you're sending data with the request, the data is
written in the "request
body" field, which is not the case for now.
You'll also notice that there is a field in which the raw
HTTP request is
written. Use it to check if there are any missing details.
Now, all that's left is to just click the Send button
and you'll get the
following response.
Congratulations, you just made your first Successful request to our
API.
Next, we'll learn how to execute the whole flow using
Postman.