Welcome to the Create it REAL Developer Portal!
Create it REAL developer portal is a one stop shop that provides an
opportunity for innovation
using
Create it REAL's APIs
to deliver innovative services such as Slicing as a service.
This documentation is created to provide you all the information
you need to connect to
Create
it REAL
APIs. As you go through the documentation of the different endpoints,
you
may want to test how our API works and what you can get from it. We
recommend you go ahead
and read the following tutorials on how to test the APIs. You have three
options:
You can use one of our Quick Start Github projects to bootstrap the
development, all you
need to do is change the app's credentials to your own and you'll be able to
start slicing immediately.
You can start playing with the Sandbox to better understand what
can be accomplished
with each endpoint. To learn how to do that, check out this
tutorial:
Sandbox Tutorial
You can use the Postman API development tool to test it,
here's a tutorial on how to do that:
Postman tutorial
Enjoy Create it REAL's REALvision API.
Quick Demo
This page is a Quick Demo guide to get you started on using this API in less then 10 min.
At the moment, there are two demos in two different languages:
                Nodejs
                C#
Nevertheless, the two demos do the same thing.
They take an STL file (or multiple STL files) from a folder in the project called
assets, calls the API to
slice it online then stores the resulting Fcode or Gcode file in an other
folder
called downloads.
As this demo is designed to get you started in a short time, it's not very detailed and you might
not
understand exactly what is going on, however:
If you need more information about the API we recommend you read the rest of the Documentation.
If you need more information about the demos, we recommend you head to: Demos.
Note:
To make this DEMO easier, example STL files are provided for test purposes.
They are stored in the assets folder.
Nodejs Quick DEMO
This is a Quick Demo on how to Slice a file Online using the REALvision Online API. This
particular DEMO
will be in NODE JS.
As this DEMO is designed to get you started in less then 10 minutes on online slicing, it lacks
some
details. For more details, please check the documentation: Nodejs Demo Tutorial.
Prerequesites: If you don't have a Subscription Key, follow this tutorial
to learn how
to get one:
Request Subscription Key
Note:
Before we start, you're going to need Nodejs, which is a
Javascript
runtime. Basically, it's a development environment.
To check if you already have it installed. Open a CLI (Command Line Interface):
In windows: Open the Start Menu and search for cmd . Open the
program that
appears.
In Linux: simply use the following shortcut: Ctrl + Alt + T . Or click the
Home button and search for Terminal.
In Mac : The Terminal app is in the Utilities folder in Applications. To open it, either
open
your Applications folder, then open Utilities and double-click on Terminal, or press
Command -
spacebar to launch Spotlight and type "Terminal," then double-click the search result.
Once you open the CLI, type the following command:
node --version
This will display the node version if you have it installed. If not, it will tell you that it
doesn't
recognize the command.
In that case, head to the Nodejs official website: Download
Nodejs, then download and install Nodejs.
So, what we will be doing is, we will download a Github template project to get you started
immediately.
First things first, let's download the Github project. Head to the following Github
Repository: REALvision API
Nodejs Demo
Click on the green Clone or Download button then click on
Download
ZIP.
Extract the realvision_api folder from the ZIP to the Desktop and open it.
Open a CLI(Command Line Interface) and type the following:
cd C:\Users\{YOUR_USERNAME}\Desktop\Github quick startup
This command goes inside the folder you just downloaded using its absolute path.
(Make sure you use your own absolute path for the folder)
Next, we'll install all the dependencies that the project will need. To do that, type:
npm install
Since we don't have many dependencies, this will be done in a few seconds depending on your
internet
connection speed.
Now we're ready!
Well, not really! :p There is one more important step, you need to give this project your
Subscription Key so that it will be able to call our API securely. To do that,
open the
.env
file in your
favorite text editor, we will use Visual
Studio
Code
Change the Subscription key value illustrated in the picture above to your own credentials.
Now we are READY. We will be slicing one of the files that are
available
by default in the github
project. It's called calicat.stl and it's in the assets folder.
Once the program is done slicing the file, it will store the resulting fcode or
gcode file
in the
downloads folder.
All you need to do is type the following command in the CLI:
npm test
You'll see some logs in the CLI illustrating the progress of the slicing process. When it's
done, it
will exit on it's own.
C# Quick DEMO
This is a Quick Demo on how to Slice an STL file (or several ones) Online using
the REALvision
Online API. This particular DEMO will be in C#.
As this DEMO is designed to get you started in less then 10 minutes on online slicing and
therefore lacks
some details. For more details, please check the documentation: C# Demo Tutorial
Prerequesits:
If you don't have a Subscription Key, follow this tutorial to learn how
to get one:
Request Subscription Key
Note:
Before we start, you're going to need .NET framework,
which is a C#
runtime. Basically, it's a development environment.
To check if you already have it installed. Open a CLI (Command Line Interface):
In windows: Open the Start Menu and search for cmd . Open the
program that
appears.
In Linux: simply use the following shortcut: Ctrl + Alt + T . Or click the
Home button and search for Terminal.
In Mac : The Terminal app is in the Utilities folder in Applications. To open it, either
open
your Applications folder, then open Utilities and double-click on Terminal, or press
Command -
spacebar to launch Spotlight and type "Terminal," then double-click the search result.
Once you open the CLI, type the following command:
dotnet --version
This will display the .NET version if you have it installed. If not, it will tell you that it
doesn't
recognize the command.
In that case, head to the .NET official website: Download
.NET, then download and install .NET .
So, what we will be doing is, we will download a Github template project to get you started
immediately.
First things first, let's download the Github project. Head to the following Github
Repository: Realvision Api C#
Demo
Click on the green Clone or Download button then click on
Download
ZIP.
Extract the REALvision-Online-API-Demo-Csharp folder from the ZIP to the Desktop and
open it.
Note:
We are using Visual Studio
Community edition as our IDE (Integrated Development Environment),
basically, a fancy name for a text editor. You can use any text editor of your choice.
However, Visual
Studio is the go to for C# development.
Now, we're ready!
Well, not really! :p There is one more important step, you need to give this project your
credentials :
Your subscription Key. Otherwise, you'll get an
"Access Denied"
response from the API.
In order to do that, head to the appsettings.json file and change the value to your
own API Key
and save the changes.
Now we are READY. We will be slicing one of the files that are
available
by default in the github
project. It's called calicat.stl and it's in the assets folder.
Once the program is done slicing the file, it will store the resulting fcode or
gcode file
in the
downloads folder.
All you need to do is click on : Ctrl + F5 if you're using Visaul Studio, or
execute the
following commands in a CLI:
cd "C:\Users\{YOUR_USERNAME}\Desktop\rvapi-demo-csharp\RealvisionClientApp" && dotnet run
The command above is actually three commands, they tell the computer to navigate all the way
to the
RealvisionClientApp folder, build the application then run it.
Eitherway, you'll see some logs in the CLI illustrating the progress of the slicing process.
And if you
check your Downloads folder you'll find the result Fcode file.
Congratulations, you just sliced a file ONLINE!!!
Discovery
Documentation Conventions
Endpoints are described with an HTTP method and a path.
Example:
POST /GetActivationStatus
Prepend the REALvision API URL to the path to get the full endpoint URL.
Example:
Square brackets, [], in the path indicate a placeholder
value that you must replace.
Example:
GET /Download?taskid=[taskId]
This API is a JSON Api, which means that the requests should have a Content-Type of
application/json.
It basically means that the body of the requests you send (Other then GET requests which don't have
a body),
must be raw JSON data.
It also means that the response you get from this API will be in JSON.
Error codes & Responses
HTTP Code
Description
200 OK
Successful request.
400 BadRequest
The request sent by the user is wrong in some way.
404 NotFound
No elements found with the given information.
401 Access Denied
Your credentials don’t allow you to access this information or
have
expired.
500 Internal Server Error
Internal server error.
Sign up and login
To start developing with our APIs, you’ll need to sign up for a
developer account. Here is what
you do:
Fill in your information and complete the captcha challenge then
click on the blue Sign
up button.
Next, you'll automatically recieve a confirmation email so that we
can verify your email.
Please
check your inbox and click on the confirmation link in the email you
received.
You'll be redirected to a page where you will re-enter your password
and click on Sign
up.
Congratulations, you are now signed up and you can login in anytime
using your email
and password.
Request a Subscription Key
Now that you are signed up, you can login to the Developer portal at
anytime using your email and
password.
That being the case, the next step is to request a Subscription Key by
following these steps:
When you login to the developer portal, go to the Products
page.
Each Product contains a set of APIs. And you, as a developer,
subscribe to a
Product and not an API. That way, you can use one
subscription key for several APIs
in case you were given access to more then one api.
Choose a product from the list.
You'll be redirected to a page where you can see the APIs available in that product, that's
also where you will
be subscribing to one of our Products.
Enter the name you'd like to give the subscription. You'll notice a blue Subscribe
button to the right.
Click on it.
Congratulations, you just subscribed to the REALvision Online product.
However, you'll need the approval of the API team first before you could receive the
Subscription Key and start calling the API.
Once your subscription request is approved, you will recieve an email
notification with all the
details needed to start consuming the API.
Obtain the Subscription Key
You're getting closer to finally getting a Subscription Key, the next
steps assume you have been
granted approval to use our APIs by the API Team. If you were granted
approval, you will have
received a notification email notifying you that your request has been
accepted.
That being the case, the next step is to get a Subscription Key by
following these steps:
You'll see information about you
and your subscriptions.
You'll see that the Subscription Key is hidden with "xxxxxxxxx ....". To see
and copy the
Subscription Key, click on show.
Note that when you use our integrated Sandbox, the API
key will be filled in for you automatically.
Congratulations, you now have a Subscription Key that you can use to
consume our APIs.
What's next?
Now that you have an API key, you'll be able to consume our APIs freely, the currently available
endpoints
are:
                    POST /GetActivationStatus
                    POST /UploadFile
                    POST /StartSlicingTask
                    POST /GetProgress
                    POST /GetPrintingInformation
                    POST /CancelSlicing
                    GET /DownloadFile
Important: The API is still in its first version, which
means that it will
undergo a lot of changes along the way while incorporating feedback from
our customers. Keep in
mind that these endpoints might change in the
future.
You want more details ?
To read the documentation concerning each endpoint : API
Endpoints
To start testing the endpoints online, head to: Sandbox
Getting Started
Here, you're going to learn how to quickly start Slicing STL
files on the cloud which
is the main functionality of the REALvision API v0.2.
But before we start, you're going to need the following prerequesites:
An account in the Create it REAL developer portal. ( To get
an account, follow this
tutorial: Sign up
and Login)
Information on the several API calls to make in order to slice an
STL file in an
easy to understand interaction flow diagram.
Basic general information on how to make HTTP calls to an API. It
includes examples that
are relevant to the REALvision API.
If you're already familiar with one or both of the above information. Feel
free to skip to the
Quick Start.
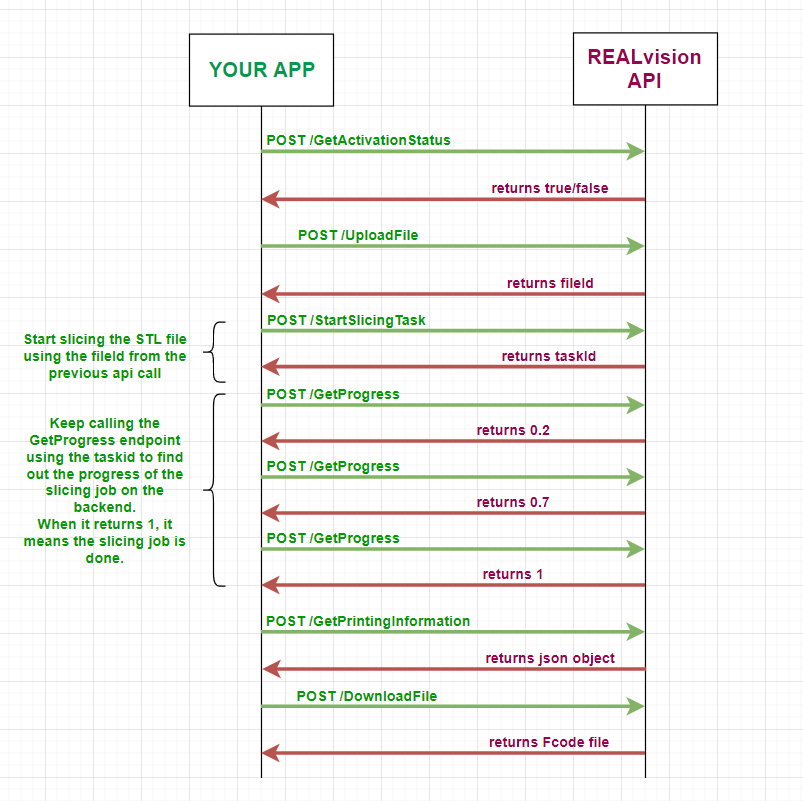
REALvision API flow:
Note: All API calls are made to
https://realvisiononline.azure-api.net/v0.2 followed by
the resource name.
example:
https://realvisiononline.azure-api.net/v0.2/GetActivationStatus
This API's main functionality is Slicing
STL files.
In other words, transforming STL files into an Fcode file
that Create it REAL
powered 3D printers can understand, or a Gcode file that most other printers can understand.
The whole process of doing that is illustrated in the following diagram:
General HTTP request information:
Generally speaking, when you make an API request, you specify 4 things:
The HTTP Method:
GET
POST
PUT
DELETE
....
The API URL and the Endpoint(Resource) you're calling.
Example:
https://realvisiononline.azure-api.net/v0.2/GetActivationStatus
In this case, the URL is https://realvisiononline.azure-api.net/v0.2 and the
resource is /GetActivationStatus
Some APIs are secured and can't be called unless some type of
Authorization to authenticate the caller is used. And to call a
secured API, you
need to
include a Header called Authorization in the API
request.
Example:
"Authorization": "Bearer eyJ0eXAiOiJKV1QiLCJhbGciOiJSUzI1N ... "
There are several types of ways you can Authorize an HTTP request,
the one used in
the
example above is called a Bearer Token and it's the one we'll be using for this API.
Other types are :
No Auth
Bearer Token
Basic Auth (username and password)
Digest Auth
OAuth 1.0
OAuth 2.0
...
Headers:
HTTP headers allow the client (Your application) and the server
(The API) to
pass additional information with the request or the response.
They're usually used for
Authentication and Caching purposes.
The Authorization header illustrated in the example above is one
of those Headers.
In our case, we will be using both the Authorization header and our own custom
header. Meaning that in order for you to call the API,
you're going to include two
Headers with the request.
One of them will be called Ocp-Apim-Subscription-Key and
it's value will be the
Subscription key you received from us:
"Ocp-Apim-Subscription-Key": "761iioaziui212ac6a49fd91156ef469c"
(To request a Subscription Key, follow this tutorial. ).
And the other one will be the Authorization header and its value will be the
token you will receive from our Authorization server:
When you make a POST request, you usually send data with
the request.
But where is that data included? It's included in the
Body of the request.
However, how do we specify the type of the data that we will be
sending? It can be JSON,
it
can be form-data, it can even be a binary file!
Well, we do that using a Header called
Content-Type.
A POST request is typically sent via an HTML form and results in
a change on the server.
In
this case, the content type is selected by putting the adequate
string in the enctype
attribute of the form element or the formenctype attribute of
the input or button
elements:
application/x-www-form-urlencoded: the keys and
values are encoded in
key-value
tuples separated by '&', with a '=' between the key and
the value.
Non-alphanumeric
characters in both keys and values are percent encoded: this
is the reason
why this
type is not suitable to use with binary data (use
multipart/form-data
instead)
multipart/form-data: each value is sent as a block of
data ("body part"),
with a
user agent-defined delimiter ("boundary") separating each
part. The keys are
given
in the Content-Disposition header of each part.
text/plain
API Clients
You can test our APIs with one of the following ways:
We'll illustrate how to test one of the endpoints using the Sandbox.
If you chose one of the APIs, you'll be able to see a list of the endpoints available in
that particular API,
click on the GetActivationStatus endpoint.
You'll notice that each endpoint has it's own endpoint title, a button you can click to
try that endpoint
online and a section that has information about how you can formulate the request.
And also a section that has information about how the response will be. If you click on
the Try it
button,
you'll be able to see code samples in several programming languages for you to test with
and an interface
you can use to execute
HTTP requests right there.
Click on the Try it button.
You'll notice that the Subscription key is already filled in
for you.
If it's not, then you might not have a Subscription Key yet, to ask for one, head
to:
Request Subscription Key
.
In case you're sending data with the request, the data is
written in the "request
body" field, which is not the case for now.
You'll also notice that there is a field in which the raw
HTTP request is
written. Use it to check if there are any missing details.
Now, all that's left is to just click the Send button
and you'll get the
following response.
Congratulations, you just made your first Successful request to our
API.
Next, we'll learn how to execute the whole flow using
Postman.
You will also need to have Postman installed. For
more information on how to
install
and use Postman to test our API. Continue reading.
In this tutorial, we'll learn how to execute the slicing flow by
using Postman. But
what is Postman exactly?
Postman is an application for testing APIs. It provides a Graphical
User Interface for
sending HTTP requests to web servers and getting the response back.
To download Postman, head to their official page: Download
Postman and download the
version that's compatible with your Operating System (Windows, Mac
or Linux).
Now that you've downloaded Postman, install it. Once you're done
installing it and you
launch Postman for the first time, it will prompt you to Sign
in or Create a free
account.
Feel free to do so, but it's not necessary in order to use the app.
There is a faint phrase
at the bottom saying: Skip signing in and take me straight to the
app.
For the purposes of this tutorial, signing in is not necessary, so
we'll skip directly to
the app.
Congrats, now we can start using Postman to test APIs.
Now it's time to start executing our Slicing flow:
Note: If you would like to download the Postman
requests and start testing
immediatly without writing a single line:
First, let's choose the POST method from the Dropdown
list of the
available
methods.
Then, let's input the link to the REALvision API :
https://realvisiononline.azure-api.net/v0.2/Input the link
in
the URL input field.
If we take a look at the slicing flow illustrated in Quick Start.
We'll see that the
first call is
POST /GetActivationStatus.
Let's start with that one, append
/GetActivationStatus to the
URL.
It's time to use that Subscription Key! Go to the
Headers tab, and
add the following header:
This time, we're not sending anything in the body, so go
ahead and click
Send.
Congratulations on your first successful request to the Realvision API.
Make sure you include the API Key in all the following requests the same way we just
did.
Now that we verified that we have the right to use the
slicing server, what's left
is to upload an STL file to the server using the /UploadFile endpoint.
The response will contain the fileid of the file you uploaded.
We will use that fileid to start a slicing task later.
When you click on Send. You'll receive a JSON object
like this one :
What's interesting for us right now is the fileid property inside the
result property.
It's the ID
that identifies the
STL file you just uploaded using the
UploadFile endpoint.
Note down that string, because we will be using it to
start the slicing task.
Now that we've uploaded the file we want to slice, what's left is to choose the
configuration we want.
For this tutorial, we chose the following configuration::
                                                supportType: "n"
                                                printerModel: "ideaWerk-Speed"
                                                configPresetName: "Recommended"
                                                configFile: ""
Note: For more information about the
StartSlicingTask
endpoint. Head to its documentation: StartSlicingTask
endpoint.
But how do we tell the Slicing Server that that's the
configuration we'd like to
use for slicing the cubetest.rvwj file?
We do so by:
First, changing the request URL from
https://realvisiononline.azure-api.net/v0.2/GetActivationStatus to
https://realvisiononline.azure-api.net/v0.2/StartSlicingTask
Then, click on the Body tag. And add all the previous configuration in
the body of the request.
Don't forget to choose the body type: raw and change the
Content-Type of the request to application/json.
Also, make sure you specified the Subscription Key in the header in the
Headers tab.
The actual body of the request will contain a JSON object with the following
properties:
fileName
fileId
supportType
configPresetName
printerModel
position:
X
Y
Z
rotation:
X
Y
Z
scale:
X
Y
Z
The configFile is not required unless you want to use your own custom
printing configuration.
This is an example of how the body of the request will look like :
When you click on Send. You'll receive a JSON object
like this one :
What's interesting for us right now is the taskId property inside the
result property. It's the ID
that identifies the
Slicing task you just started using the
StartSlicingTask endpoint.
Note down that string, because we will be using it to
check the progress
of the slicing task.
Now that we have started a slicing task, let's check out it's
progress. But how
do we do that?
We do so by calling the /GetProgress endpoint
with the
taskId that we got as a response to the
POST /StartSlicingTask
request.
First, let's change the URL link to :
https://realvisiononline.azure-api.net/v0.2/GetProgress
Now, let's add the taskId we received
from the
previous request in the Body of the
/GetProgress
request:
When you click on Send, you'll get a response like this:
The progress value will be between 0 and 1
illustrating the progress of the slicing task in
percentage.
If you keep calling it repeatedly, you'll notice that
the response
will be different each time until the slicing task finishes or fails.
Now that the Slicing Server has finished slicing the file we
sent it,
it's time to get information about the slicing task.
Next, let's go to the Body tab and add the taskId
we received from the
/StartSlicingTask request:
We'll get a response like this one :
The response will contain data about the slicing task.
We're almost there, you're at the final step of the slicing
flow. It's time to
Download the FCode or GCode file!
And we do that by sending a GET request to the
/DownloadFile endpoint
with the taskId of the slicing task that we received
as a response from
the /StartSlicingTask request in the query parameters:
First, let's change the URL to:
https://realvisiononline.azure-api.net/v0.2/DownloadFile
Next, let's add the taskId in the Query Parameters of the
request using the Params tab.
The only thing that's left is to click on Send &
Download
Note: Once you Download the file once, it gets
deleted from the server.
So, even if you call the /DownloadFile endpoint with
the same
taskId, you'll get an error.
You will also need to have Node Js installed. For
more information on how to
install Node Js: Install
Nodejs
One more thing, you will need to have Git installed.
It is not required, but it would help more if you do install
it.
For more information on how to install Git: Download Git.
In this tutorial, we'll learn how to execute the slicing flow by
using a Node Js app.
First, let's check if you've got Nodejs installed or not. Open a
command line interface and type the following:
node --version
npm --version
If you've got nodejs installed, a version number will appear.
Otherwise, the command line will just tell you that it doesn't
recognize the command.
NPM is a node packet manager that comes pre-installed with Nodejs.
Next, let's downlaod the template project. Head to :
https://github.com/createitreal/rvapi-demo-nodejs
And download the project either by using the green Clone or
download button and clicking on Download ZIP, or by
using the following CLI command:
git clone https://github.com/createitreal/rvapi-demo-nodejs.git
Note:
This command won't work if you don't have Git installed.
Now, open the folder you just downloaded in your favorite editor
(We'll be using VS code ).
What you need to do first is execute the following command inside the
folder:
npm install
It will install all the dependencies that are necessary for this
code to run. There are only a few, so it won't take much time.
You'll notice that a folder called node_modules appears.
That's where all the dependencies are saved.
Head to the .env file and change the API Key.
Warning: Never, under any circumstances, share the
.env file with anyone, it is a file that generally contains
sensitive information about your app.
It is recommended that you add it to the .gitignore file so
it won't be pushed to your remote repository when you push changes.
For now, we'll use the default configs and slice the default cubetest.stl file.
There are two ways you can do that and they both involve using the
command line interface. Make sure to cd into the github project and
execute the following command:
npm slice
What that command will do is that it will execute the slicing flow
automatically for you, slice the chosen file which in this case is cubetest.rvwj and
store the resulting Gcode file in the downloads folder.
You can do the same thing by using the following command:
node App.js
What that command does is that it simply executes the App.js
file.
You'll see some logs coming up in the command line interface showing
the progress of the slicing process. When it's finished you'll find
a new file in the downloads folder.
Congratulations, you just sliced an STL file on the cloud.
You will also need to have .NET framework installed. For
more information on how to
install .NET framework: Install
.NET framework
One more thing, we recommend you install Visual Studio Community but it's not a
requirement.
To download and install Visual Studio: Download Visual Studio
In this tutorial, we'll learn how to execute the slicing flow by
using a .NET Core Console app. Basically, we'll be coding in
C#.
First, let's check if you've got .NET Core installed or not. Open a
command line interface and type the following:
dotnet --version
dotnet --version
If you've got .NET installed, a version number will appear.
Otherwise, the command line will just tell you that it doesn't
recognize the command.
In this project, we will be using Visual Studio as it's the best IDE out there that's
tailored to C# development.
Next, let's download the template project. Head to :
https://github.com/createitreal/rvapi-demo-csharp
And download the project by using the green Clone or
download button and clicking on Download ZIP.
Now, open the folder you just downloaded and open the REALvision Online DEMO.sln
file using Visual Studio.
The Solution has two projects in it:
The RealvisionClientApp which we will use to test the library.
The library itself which we use to call the API.
Basically you've got two choices right now, either change the API Key in the
appsettings.json and just execute the Console App and see magic happen, or continue
reading and see HOW the magic is happening.
If you're using Visual Studio you only need to click on F5 and the code will
start running. However, if you don't want
to install a whole IDE just to execute this simple task, you can always use the CLI to do
it.
You do that by first navigating to the console application folder from the CLI or
Terminal by executing the following commaned:
cd C:\Users\[YOUR_USERNAME]\Desktop\democsharprvclient\rvwsapi-demo-csharp
Don't forget to use your own absolute path to that folder.
Next, you execute the following command to build then run the project:
dotnet run
Remember that you need a subscription key in order to use the API?
In order to specify the API Subscription Key, open the appsettings.json file and change
the API Key value to your own API Key.
Warning: Never, under any circumstances, share the
Subscription Key with anyone and be careful not to push it into a public git repository.
Let's test if you have access to the API or not. Build and execute the Program.cs file as
it is right now and see if you get any errors.
If everything went smoothly, you'll see a reponse in your Command Line Interface (CLI).
Now that we know the API works, let's start Slicing files online!
First things first, we need to specify a few things to get started. We need to specify the files
we want to slice and the configs to be used for each file.
We do that in the stlFilesToSlice.json file.
The file is basically and JSON array of all all the files we want to slice, at the moment the
array only contains one file. But we can give it more than that.
This feature comes in handy when you want to automate slicing several files with different
configs.
So, each file is represented in a JSON object like this one:
Now, let's see if we can start a slicing task, build and execute the Program.cs
file as it is above. If all went smoothly, you'll see a response in your CLI.
What you just did is: you started a Slicing task online. Once the slicing is done you'll
be able to Download the FCode or GCode file.
But how do we know if the slicing is done or if it's still running?
We do that by calling the GetProgress API endpoint.
When it returns : 1 that's when the Slicing is done. And that's when you can
Download the file.
There is one more API endpoint that you can use to get information about the slicing process:
/GetPrintingInformation.
For now it returns the time it's going to take to print the file, the length of
the filament it'll need and of course,
its weight.
Now, if you execute the project, you'll see the response in your CLI.
Congratulations, you just sliced a file on the cloud.
Api endpoints
Introduction
The REALvision Online API enables you to slice STL files online by using our Cloud
Slicer. Thus saving yourself time and power by outsourcing the slicing procedure to a cloud
server.
If you're not familiar with how to call an API, check:
API Basic Tutorial.
In case you don't need a refresher on APIs and you can't wait to start
slicing STL
files, you can head directly to our
Quick Start tutorial.
The API uses Subscription Keys to authenticate the requests.
Base URL
The Authentication API is served over HTTPS. All URLs referenced in the documentation have
the following
base:
https://realvisiononline.azure-api.net/v0.2
Code samples
For each endpoint you will find sample HTTP request snippets in the black box on the right.
Testing
You can test the endpoints using either the
Sandbox
or our preconfigured Postman collection:
If you're not sure how to use any of the above, head to our
Quick Start Tutorials
for a detailed tutorial on each of them.
Test with the Sandbox
The
Sandbox
is a platform you can use to test several endpoints of the Authentication API.
If it's the first time you use it and you're not sure how, head to the
Sandbox Tutorial
.
Test with Postman
If you are working with APIs, you are probably already familiar with
Postman, a development tool that
enables
you to configure and run API requests.
We have preconfigured a collection that you can download:
For more information on how to use Postman, refer to the
Postman Tutorial
.
Errors
When an error occurs, you will receive an error object. Most of these error objects contain
an error
code and an error description so that your applications can more efficiently identify the
problem.
If you get a
4xx
HTTP response code, then you can assume that there is a bad request from your end. In this
case,
check the
Error Codes and Responses
for more context.
5xx
errors suggest a problem on our end, so in this case, you may use the
Issues Page
to tell us about the problem and we'll reply as soon as humanly possible.
REALvision API
GetActivationStatus
POST /getactivationstatus http/1.1
host: realvisiononline.azure-api.net
ocp-apim-subscription-key: [YOUR_API_KEY_HERE]
content-type: application/json
Use this endpoint to check if the Online Slicer is active and ready to
take slicing
requests.
You can use our
Sandbox
to test this endpoint. In order to do so you need to be logged in
and have a
Subscription Key
Test with Postman
You can test this endpoint using :
Postman. We have a
preconfigured
collection that you can download and use. Simply click the button
below.
If the button doesn't work for you, download this collection and
import it in Postman by clicking on the
Import button on the top left corner:
Download.
You can use our
Sandbox
to test this endpoint. In order to do so you need to be logged in
and have a
Subscription Key
Test with Postman
You can test this endpoint using :
Postman. We have a
preconfigured
collection that you can download
and use. Simply click the button below.
If the button doesn't work for you, download this collection and
import it in Postman by clicking on the
Import button on the top left corner:
Download.
Starts a new slicing task using a fileid, which is the ID of the
file you
uploaded using the POST /Uploadfile endpoint.
Not to forget a set of parameters like the config preset, support type
and prnter
model ...
POST/StartSlicingTask
Request Body Schema
Property
Description
filename Required
The filename of the file to be sliced. it must have a
.stl
extension.
fileid Required
The id of the file you uploaded using the POST /Uploadfile
endpoint,
it's the id of the file you want to slice.
supporttype Required
you have
three options with this parameter:
n : which means no support.
e : which means support
everywhere
b : which means support on
the build plate
printermodel Required
The type of
the printer you'll be using to print
the file. (if preset is used)
configpresetname DEPRECATED
IN FAVOR OF
"qualitypresetname"
The name of the preset you'll be
using. you have the option of using
your own configurations, if that's
the case, leave this empty and send
your custom configuration file to
the server using the
configFile parameter.
applicationpresetname
the name of the application preset you'll be
using. you have the option of using
your own configurations, if that's
the case, leave this empty and send
your custom configuration file to
the server using the
configFile parameter.
machinepresetname
The name of the Machine preset you'll be using. If
unspecified it
defaults to "Recommended".
You have the option of using
your own configurations, if that's
the case, leave this empty and send
your custom configuration file to
the server using the
configFile parameter.
filamentpresetname
The name of the Filament preset you'll be using. If
unspecified it
defaults to "CREATECH_PLA".
You have the option of using
your own configurations, if that's
the case, leave this empty and send
your custom configuration file to
the server using the
configFile parameter.
qualitypresetname
The name of the Quality preset you'll be using. If
unspecified it
defaults to "Recommended".
You have the option of using
your own configurations, if that's
the case, leave this empty and send
your custom configuration file to
the server using the
configFile parameter.
position Required
the position in the workspace of the STL file in cartesian
coordinates
X
Y
Z
scale Required
the scale of the object in the workspace of the STL file in
cartesian
coordinates
X
Y
Z
rotation Required
the rotation in the workspace of the STL file in cartesian
coordinates
X
Y
Z
configfile
Contains the following two properties:
FileName: the name of the file, it must have a
.rvwj extension.
WsConfigs: the contents of the Workspace file you
want to slice,
it's in JSON.
Test with Postman
You can test this endpoint using : Postman.
we have a preconfigured collection that you
can
download and use. simply click the button
below.
If the button doesn't work for you, download this collection and
import it in Postman by clicking on the Import button on the
top left corner:
Download.
The taskid
you got as a response to the
StartSlicingTask request.
Test with Postman
You can test this endpoint using : Postman.
we have a preconfigured collection that you
can
download and use. simply click the button
below.
If the button doesn't work for you, download this collection and
import it in Postman by clicking on the
Import button on the top left corner:
Download.
DownloadFile
GET /DownloadFile?taskid=63b69fa8-dd47-41d3-b37a-5869036cd124 HTTP/1.1
Host: realvisiononline.azure-api.net
Ocp-Apim-Subscription-Key: [YOUR_API_KEY_HERE]
GET/downloadfile
Request Parameters
Parameter
Description
taskid Required
The taskid
you got as a response to the
StartSlicingTask request. You add it as a query
parameter in the
link.
Test with Postman
You can test this endpoint using : Postman.
we have a preconfigured collection that you
can
download and use. simply click the button
below.
If the button doesn't work for you, download this collection and
import it in Postman by clicking on the
Import button on the top left corner:
Download.